Importing data (general instructions): Difference between revisions
HarrySmythe (talk | contribs) No edit summary |
No edit summary |
||
| (5 intermediate revisions by 2 users not shown) | |||
| Line 42: | Line 42: | ||
= Automated Import Using ImportXLS: Single Import = | = Automated Import Using ImportXLS: Single Import = | ||
External data available in Excel format known to IFs can be extracted into Access tables using IFs application's automated ImportXLS (the process works only for Excel files and hence the name) feature that work by importing one time series at a time. | External data available in Excel format known to IFs can be extracted into Access tables using IFs application's automated ImportXLS (the process works only for Excel files and hence the name) feature that work by importing one time series at a time. If you have subnational models broken out in IFs on your computer, you need to switch back to the full 186 country model. Instructions on how to do this can be found in the [[SubRegionalization_Handbook|SubRegionalization Handbook]]. This process will take around five minutes, so can be done as frequently as needed. | ||
This feature can be accessed through IFs menu system: | This feature can be accessed through IFs menu system: | ||
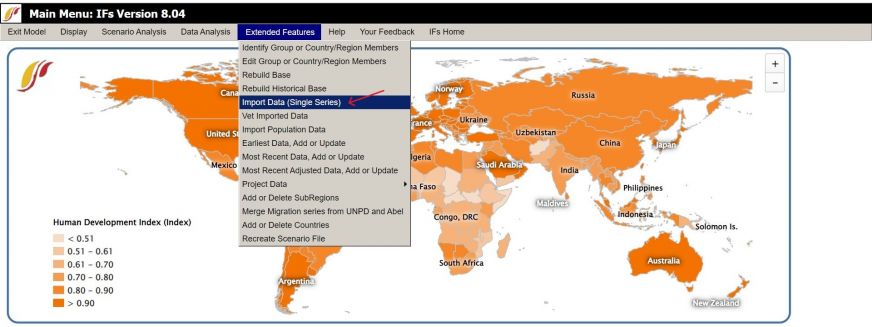
IFs -> MainMenu->Extended Features | IFs -> MainMenu->Extended Features -> Import Data (Single Series). | ||
[[File:Importing IMG 1.jpg|center|thumb|872x872px|IFs Main Menu]] | |||
[[File: | This opens up a form shown below: | ||
[[File:Importing IMG 3.jpg|center|thumb|869x869px|Single Import Page]] | |||
The form is self-explanatory for the most part. You have to start by opening the source Excel file (select "Choose File") and selecting the spreadsheet which contains source. Then click "Refresh Sheets" and choose the desired Excel sheet. You then need to choose one from the six options showing the format of the data organization in the source spreadsheet (see the right side of the import screen). The default of these six options (the one at the bottom) works in most cases, however you can compare each option to your data by selecting a data organization option and viewing the layout in the image directly below the final option. | |||
The | The list of steps to follow when importing data can be found in the "Help" menu option, which opens up a dialog box with the basic list. | ||
[[File:ImportDataInstructions.png|RTENOTITLE]] | [[File:ImportDataInstructions.png|RTENOTITLE]] | ||
This list is fleshed out here in more detail and should be followed carefully: | |||
'''1. Open the Excel file containing formatted source data (option found on top bar)''' | |||
'''2. Select one spreadsheet when the source file contains more than one''' | |||
'''3. Select source data format using illustrated options''' | |||
Each option can be previewed by selecting it and seeing the visualization directly below | |||
'''4. Identify the Excel cells containing country and year labels.''' | |||
If you do not remember when it starts, you can click ''View Excel File ''to check - the file must be closed after viewing | |||
The ''Series Name Start at'' field will only appear if you have selected a ''Multiple Series'' option in the ''Choose Excel Source Data Format'' field. In this case, you choose the column of the data series you want to import. | |||
'''5. Data Conversion Operator and Factor''' | |||
'''????''' | |||
'''6. Choose aggregation rule''' | |||
An aggregation rule tells the model how to aggregate country level data up to different country groupings that can be selected in the model. For instance, if you choose SubSaharan Africa as a region, the model needs to know whether to add, average, use a weighted average for all countries in the grouping. | |||
There are five different aggregation rules to choose from: POP, GDP, AVG, SUM, LND. If the dataset is being updated, the aggregation rule should populate. If you are importing a new series, you have to choose the aggregation rule. You can look in the Data Dict at similar series to get an idea of what should be chosen or below are brief explanations of each, along with a few examples of datasets that use each rule. | |||
1. POP (population): uses a weighted average in which population of a country is the weight; used in demographics, health, and education series; used in series with per capita designations or when the variable is based on a percent of households (HHs) | |||
2. GDP: uses a weighted average in which GDP at MER of a country is the weight; used in economic series and when price is a consideration in the dataset | |||
3. AVG (average): takes the average of each country's data; used in indices | |||
4. SUM: sums each country's data; used in many energy and labor series and when the data is a count | |||
5. LND (land): uses a weighted average using land cover as weight | |||
'''7. Choose Country Concordance table ''' | |||
Country Concordance lists are used in converting external data to IFs format. "Country Concordance" options are shown in a dropdown list at the bottom of the screen. The prepackaged lists that you see in the dropdown were built over the years from the major international databases like World Bank's WDI, UNESCO, IEA etc. If you do not see a list that you can use you need to either use a manual import described above in section 3.1.1 or leave ImportXLS for now, build and update a country list and then come back to import. Unless a data source has a large number of tables that we will be regularly updating we do not spend the time in building and updating a new country concordance table. As a general rule, decimals should be truncated after the 4th decimal place. | |||
'''8. Identify missing values, if any. Data source and names can be put in later. ''' | |||
'''9. Enter a name and a definition for the imported table. If the variable is new, the name must be different from any existing table name. ''' | |||
If you are importing a new variable into the model, ask the person who assigned you this task for a specific name. If not provided at first, this can be added in the Data Dict after the import is complete. If you would like to update an existing table rather than import a new one, you can select the name of the table from a dropdown box just above the variable name box. Selecting an existing table will automatically bring in dictionary information from the master copy of the data dictionary. | |||
'''10. Click Import when you are ready. ''' | |||
'''11. Click on View Excluded after importing the data''' | |||
You'll see the countries that were not imported, if any. This may have happened because the IFs model does not have those countries in the model or because the name was incorrect and did not concord. If the name was incorrect, go back into the source file and change the country name and re-import the data. | |||
'''12. After accepting imported data, you'll see a form to enter data dictionary information. ''' | |||
Here are some tips on what to enter in the different fields in the data dict that do not auto-populate from the import: | |||
''Series ''& ''Cohort'': the entry for Series is Yes and for Cohort is No | |||
''Source Definition'': the exact definition from the data source | |||
''Extended Source Definition'': any information in addition to the source definition, such as any calculations or modifications you or the creators of the dataset performed on the data | |||
''Name in Source'' & ''Code in Source'': only relevant for batch pulls since there are multiple series in the pull | |||
''Notes'': enter your initials as data puller/importer and the data vetter will then enter their initials | |||
''Forecast'': click Yes if the series imported is a forecast and not a historical data series | |||
[[File:Importing IMG 4.jpg|center|thumb|912x912px|Data Dictionary]] | |||
'''13. Imported data will go to IFs\Data\IFsDataImport.mdb.''' | |||
This is the file you will send to the person responsible for vetting and merging the data into the model. | |||
'''14. Dictionary information will go to IFs\Data\IFsDataDict.mdb. ''' | |||
Any changes that need to be made to the data dict can be made directly here after the data is imported. | |||
== Passing Extracted Data for Vetting == | == Passing Extracted Data for Vetting == | ||
Extracted data will be saved in <u>Data\IFsDataImport.Mdb</u>. Dictionary info is saved in a table named "datadict" inside this same .mdb. You need to send this .mdb and all external source Excel to the person who will do the vetting. Some initial scrutiny of the data before it is sent for vetting is recommended. The new automated vetting feature of IFs (described in the vetting section below) can be useful. | Extracted data will be saved in <u>Data\IFsDataImport.Mdb</u>. Dictionary info is saved in a table named "datadict" inside this same .mdb. You need to send this .mdb and all external source Excel to the person who will do the vetting. Some initial scrutiny of the data before it is sent for vetting is recommended. The new automated vetting feature of IFs (described in the vetting section below) can be useful. | ||
= Batch Update Using ImportXLSBatch = | = Batch Update Using ImportXLSBatch = | ||
Another form has been created that allows import from an | Another form has been created that allows import from an Access table. This needs to be described, and shown. | ||
Batch update, another IFs application feature, allows updating all IFs tables pertaining to a certain external source at once. This works only for those sources where data is available in a recognized format and each source series is identified with a fixed code that IFs data dictionary can save and match during subsequent updates. At this moment, batch update works for AQU, WDI, UNESCO (UIS), IMF and FAO. | Batch update, another IFs application feature, allows updating all IFs tables pertaining to a certain external source at once. This works only for those sources where data is available in a recognized format and each source series is identified with a fixed code that IFs data dictionary can save and match during subsequent updates. At this moment, batch update works for AQU, WDI, UNESCO (UIS), IMF and FAO. | ||
| Line 90: | Line 158: | ||
Before using the batch import process, new variables must be added to the datadict and the source column of the datadict must be formatted for batch import by including one of the qualified series listed above (FAO, IMF, AQU, etc). Additionally, each data series in the external spreadsheet is matched with an IFs data table through a "series code" that is previously collected in the IFs "datadict" table. For WDI, these codes appear as combination of two to four letter code sections separated by periods (e.g., AG.PRD.FOOD.XD). For UNESCO education data, we take series names used by UIS, exactly as they type it, as series codes. For FAO data, Element code and Item code used by FAO are used by IFS (accordingly, there will be two series code boxes in the batch update form when you are updating FAO data; identify Element code as the first one and Item code as the second one). | Before using the batch import process, new variables must be added to the datadict and the source column of the datadict must be formatted for batch import by including one of the qualified series listed above (FAO, IMF, AQU, etc). Additionally, each data series in the external spreadsheet is matched with an IFs data table through a "series code" that is previously collected in the IFs "datadict" table. For WDI, these codes appear as combination of two to four letter code sections separated by periods (e.g., AG.PRD.FOOD.XD). For UNESCO education data, we take series names used by UIS, exactly as they type it, as series codes. For FAO data, Element code and Item code used by FAO are used by IFS (accordingly, there will be two series code boxes in the batch update form when you are updating FAO data; identify Element code as the first one and Item code as the second one). | ||
The decimal places box is used for specifying the decimal places that will be kept in extracted tables. The setting works for those tables which do not have such setting established already (as shown in the grid above). | The decimal places box is used for specifying the decimal places that will be kept in extracted tables. As a general rule, decimals should be truncated after the 4th decimal place. The setting works for those tables which do not have such setting established already (as shown in the grid above). | ||
[[File:BatchImportWizard.png|RTENOTITLE]] | [[File:BatchImportWizard.png|RTENOTITLE]] | ||
Latest revision as of 02:19, 25 September 2023
Introduction
This section describes the import and update processes for data tables in IFsHistSeries.Mdb. Updating World Value Survey data (IFsWVSCohort.MDB) requires following a slightly different procedure.
Data import for IFs is a three step process:
- Extraction, preparation and blending of source data (and meta-data) into MS Access tables formatted for IFs database. This step might involve a blending process when data is updated.
- Vetting of MS Access tables containing extracted data (and meta-data)
- Merging of the MS Access table (and meta-data) to IFs master database (IFsHistSeries.Mdb and Datadict.mdb)
In this section we shall discuss how to extract data from external sources, prepare extracted data for IFs database and blend extracted data with existing data. When updating an existing data table we usually preserve data not reported in the more recent source to maintain consistency between old and new data, a process we call blending.
There are three ways to import data from external sources and prepare it for IFs as a new series or as an update of an existing series:
- Manual import, which basically involves reorganizing external data into an IFs template spreadsheet and copying that data to an MS Access table
- Automated import that uses IFs software application to extract data from Excel spreadsheets and prepare Access tables using a Country Concordance table between external data source and IFs.
- Batch update, another IFs application feature that automates updating all IFs tables from the same external source as long as external data is available in a required format.
Manual Import Using IFs Template Spreadsheet
The steps for the manual import are:
- Enter or reorganize external data into IFs template spreadsheet. The IFs team uses an Excel spreadsheet template containing 186 IFs countries, country FIPS code and year columns going from 1960 to 2014. The name of the Excel file is "Template Data Form 6.XLS." This file can be found in the IFs\Data folder. (Template spreadsheets can also be generated from IFs application's import screen)
- Delete year column in the template spreadsheet which do not have any data.
- Create an MS Access table with the same structure (i.e., containing the same year columns) as the template spreadsheet. This new Access table needs to be created inside "IFsDataImport.Mdb" file in the IFs\Data folder. If you are updating an existing table, you should give the table the same name as the existing table. For a new table, prefix the table name with "Series" and follow the naming convention described in section 2.2.
Tip: Rather than creating an altogether new Access table, take an existing data table, i.e., any of the IFsHistSeries.mdb tables, copy it to a new name and change the structure by going to "Design View" in MS Access. In fact, it is best to start from an existing table so that the data field specifications are strictly followed. To add a year to the new table, insert an empty column (in the design view), copy an existing year column, paste it on the empty column and change the column (or field) name to the label of the year you need. (If you are using an existing Access table to create a new table, please delete the Earliest and MostRecent columns from the Access table as this will be populated automatically by IFs application.)
- Copy and paste the data from Excel template spreadsheet to Access table. Make sure you sort both the spreadsheet and the Access table alphabetically by country name before you copy and paste.
- Add a row to the Datadict table inside IFsDataImport.Mdb file. If you are importing new data, create an empty row and add meta-data (please be as complete as possible). If you are updating data, copy the row from master copy of Datadict (DataDict.Mdb) and edit as needed (you must edit last IFs update)
Tip: You can skip steps iii, iv and v and use IFs' automated import (see next section for description) feature instead
Passing Extracted Data for Vetting
Extracted data, saved in Data\IFsDataImport.Mdb, need to be sent to the person who will do the vetting. Please also pass all source information (Excel spreadsheet data or pdf file/s or the website from which data is taken). Some initial scrutiny of the data before it is sent for vetting is recommended.
Automated Import Using ImportXLS: Single Import
External data available in Excel format known to IFs can be extracted into Access tables using IFs application's automated ImportXLS (the process works only for Excel files and hence the name) feature that work by importing one time series at a time. If you have subnational models broken out in IFs on your computer, you need to switch back to the full 186 country model. Instructions on how to do this can be found in the SubRegionalization Handbook. This process will take around five minutes, so can be done as frequently as needed.
This feature can be accessed through IFs menu system:
IFs -> MainMenu->Extended Features -> Import Data (Single Series).
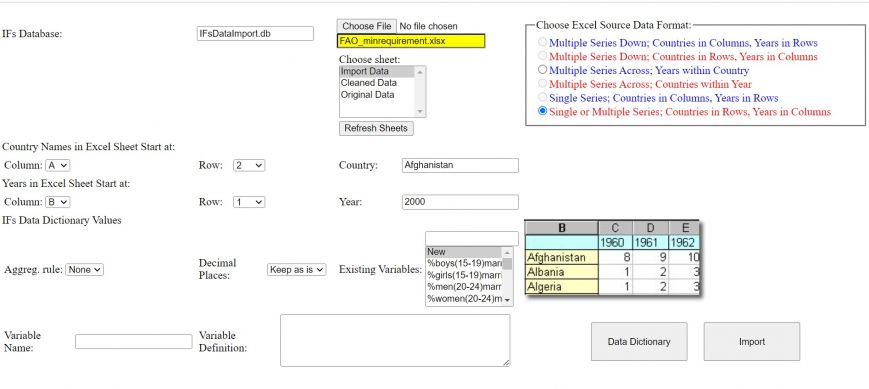
This opens up a form shown below:
The form is self-explanatory for the most part. You have to start by opening the source Excel file (select "Choose File") and selecting the spreadsheet which contains source. Then click "Refresh Sheets" and choose the desired Excel sheet. You then need to choose one from the six options showing the format of the data organization in the source spreadsheet (see the right side of the import screen). The default of these six options (the one at the bottom) works in most cases, however you can compare each option to your data by selecting a data organization option and viewing the layout in the image directly below the final option.
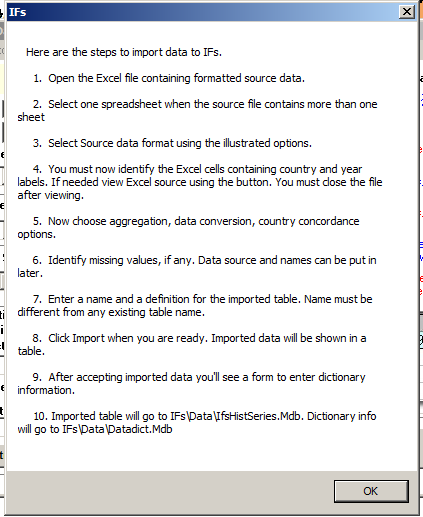
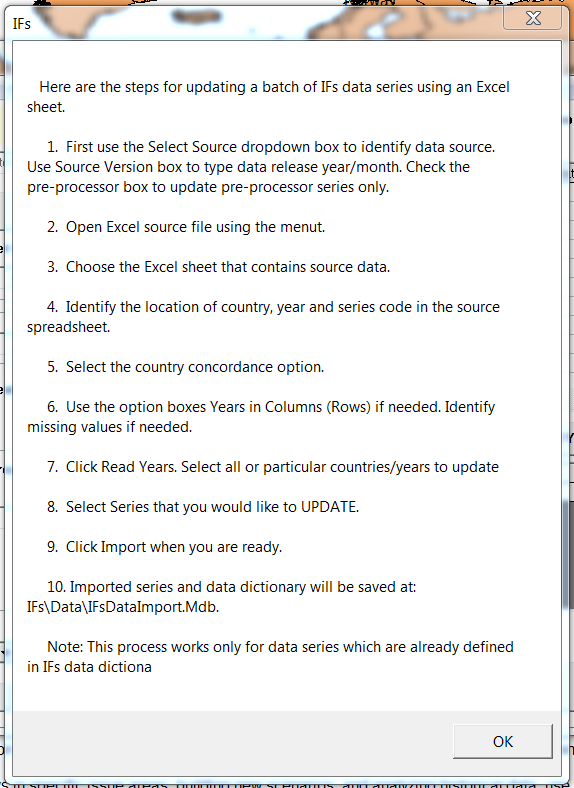
The list of steps to follow when importing data can be found in the "Help" menu option, which opens up a dialog box with the basic list.
This list is fleshed out here in more detail and should be followed carefully:
1. Open the Excel file containing formatted source data (option found on top bar)
2. Select one spreadsheet when the source file contains more than one
3. Select source data format using illustrated options
Each option can be previewed by selecting it and seeing the visualization directly below
4. Identify the Excel cells containing country and year labels.
If you do not remember when it starts, you can click View Excel File to check - the file must be closed after viewing
The Series Name Start at field will only appear if you have selected a Multiple Series option in the Choose Excel Source Data Format field. In this case, you choose the column of the data series you want to import.
5. Data Conversion Operator and Factor
????
6. Choose aggregation rule
An aggregation rule tells the model how to aggregate country level data up to different country groupings that can be selected in the model. For instance, if you choose SubSaharan Africa as a region, the model needs to know whether to add, average, use a weighted average for all countries in the grouping.
There are five different aggregation rules to choose from: POP, GDP, AVG, SUM, LND. If the dataset is being updated, the aggregation rule should populate. If you are importing a new series, you have to choose the aggregation rule. You can look in the Data Dict at similar series to get an idea of what should be chosen or below are brief explanations of each, along with a few examples of datasets that use each rule.
1. POP (population): uses a weighted average in which population of a country is the weight; used in demographics, health, and education series; used in series with per capita designations or when the variable is based on a percent of households (HHs)
2. GDP: uses a weighted average in which GDP at MER of a country is the weight; used in economic series and when price is a consideration in the dataset
3. AVG (average): takes the average of each country's data; used in indices
4. SUM: sums each country's data; used in many energy and labor series and when the data is a count
5. LND (land): uses a weighted average using land cover as weight
7. Choose Country Concordance table
Country Concordance lists are used in converting external data to IFs format. "Country Concordance" options are shown in a dropdown list at the bottom of the screen. The prepackaged lists that you see in the dropdown were built over the years from the major international databases like World Bank's WDI, UNESCO, IEA etc. If you do not see a list that you can use you need to either use a manual import described above in section 3.1.1 or leave ImportXLS for now, build and update a country list and then come back to import. Unless a data source has a large number of tables that we will be regularly updating we do not spend the time in building and updating a new country concordance table. As a general rule, decimals should be truncated after the 4th decimal place.
8. Identify missing values, if any. Data source and names can be put in later.
9. Enter a name and a definition for the imported table. If the variable is new, the name must be different from any existing table name.
If you are importing a new variable into the model, ask the person who assigned you this task for a specific name. If not provided at first, this can be added in the Data Dict after the import is complete. If you would like to update an existing table rather than import a new one, you can select the name of the table from a dropdown box just above the variable name box. Selecting an existing table will automatically bring in dictionary information from the master copy of the data dictionary.
10. Click Import when you are ready.
11. Click on View Excluded after importing the data
You'll see the countries that were not imported, if any. This may have happened because the IFs model does not have those countries in the model or because the name was incorrect and did not concord. If the name was incorrect, go back into the source file and change the country name and re-import the data.
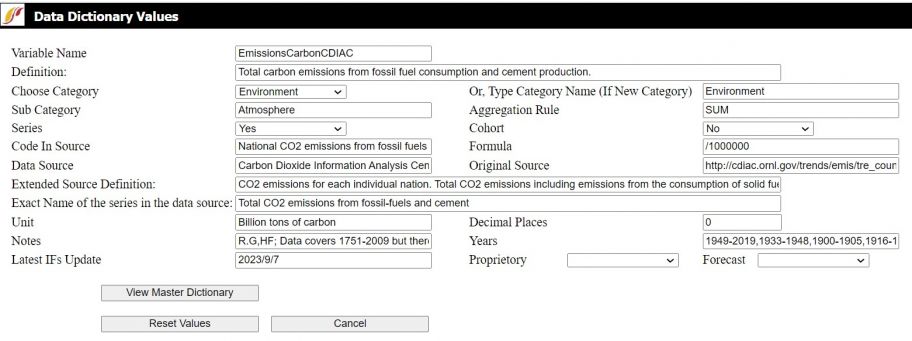
12. After accepting imported data, you'll see a form to enter data dictionary information.
Here are some tips on what to enter in the different fields in the data dict that do not auto-populate from the import:
Series & Cohort: the entry for Series is Yes and for Cohort is No
Source Definition: the exact definition from the data source
Extended Source Definition: any information in addition to the source definition, such as any calculations or modifications you or the creators of the dataset performed on the data
Name in Source & Code in Source: only relevant for batch pulls since there are multiple series in the pull
Notes: enter your initials as data puller/importer and the data vetter will then enter their initials
Forecast: click Yes if the series imported is a forecast and not a historical data series
13. Imported data will go to IFs\Data\IFsDataImport.mdb.
This is the file you will send to the person responsible for vetting and merging the data into the model.
14. Dictionary information will go to IFs\Data\IFsDataDict.mdb.
Any changes that need to be made to the data dict can be made directly here after the data is imported.
Passing Extracted Data for Vetting
Extracted data will be saved in Data\IFsDataImport.Mdb. Dictionary info is saved in a table named "datadict" inside this same .mdb. You need to send this .mdb and all external source Excel to the person who will do the vetting. Some initial scrutiny of the data before it is sent for vetting is recommended. The new automated vetting feature of IFs (described in the vetting section below) can be useful.
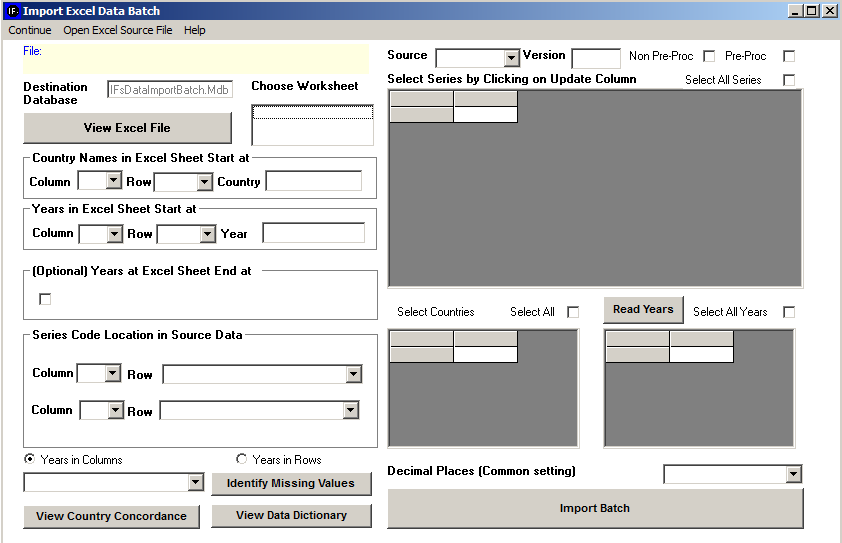
Batch Update Using ImportXLSBatch
Another form has been created that allows import from an Access table. This needs to be described, and shown.
Batch update, another IFs application feature, allows updating all IFs tables pertaining to a certain external source at once. This works only for those sources where data is available in a recognized format and each source series is identified with a fixed code that IFs data dictionary can save and match during subsequent updates. At this moment, batch update works for AQU, WDI, UNESCO (UIS), IMF and FAO.
The batch update feature can be reached through IFs main menu:
IFs -> MainMenu->Extended Features -> Manage Country Data->Historic Data File Processing-> Update Data in Batch.
The form that opens up is shown below. The grid on the right of the form will be empty initially, but fills up as soon as the user selects a source name from the dropdown box sitting above the grid. You can select all series for batch update (a checkbox is available for this) or decide to update the ones that you select by clicking on the "Update" column in the grid. There is an additional option of selecting only those variables per data source which are used in the Pre-Processor, which can be selected by checking the ‘Pre-Proc’ box on the batch import form seen below. Of course, the import process will update only those series that are found in the source Excel that you'll have to open using the menu at the top.
Batch update feature works by extracting multiple data series from a single spreadsheet at a time. From the box listing all spreadsheets in the workbook that you just opened, you will have to select the one that contains all the series dat.
Before using the batch import process, new variables must be added to the datadict and the source column of the datadict must be formatted for batch import by including one of the qualified series listed above (FAO, IMF, AQU, etc). Additionally, each data series in the external spreadsheet is matched with an IFs data table through a "series code" that is previously collected in the IFs "datadict" table. For WDI, these codes appear as combination of two to four letter code sections separated by periods (e.g., AG.PRD.FOOD.XD). For UNESCO education data, we take series names used by UIS, exactly as they type it, as series codes. For FAO data, Element code and Item code used by FAO are used by IFS (accordingly, there will be two series code boxes in the batch update form when you are updating FAO data; identify Element code as the first one and Item code as the second one).
The decimal places box is used for specifying the decimal places that will be kept in extracted tables. As a general rule, decimals should be truncated after the 4th decimal place. The setting works for those tables which do not have such setting established already (as shown in the grid above).
The steps are explained in a Help dialog shown below:
Clicking the "Import Batch" button will import (and update) the series that are selected in the grid one at a time and show a progress bar as this is being done.
Imported tables can be subjected to automated blending and vetting using the new vetting/comparison interface described later in this document.
Source Data for Batch Update
World Development Indicator (WDI) data is released annually and is usually available as a single Excel file at their website:
http://data.worldbank.org/data-catalog/world-development-indicators/
FAO and UIS data do not come in single file as WDI. What we need to do is download multiple series on related issues (e.g., all cereal production data or all primary education data) as single Excel files. (Kate McGrath has prepared instructions on getting FAO and UIS data from their websites).
IMF data is available only by accessing our IMF e-Library account, registered to Mohammod Irfan.
Passing Extracted Batch Data for Vetting
Extracted data will be saved in Data\IFsDataImportBatch.Mdb. Dictionary info is saved in a table named "datadict" inside this same .mdb. You need to send this .mdb and all external source Excel to the person who will do the vetting. Some initial scrutiny of the data before it is sent for vetting is recommended. The new automated vetting feature of IFs (described in the vetting section below) can be useful.
Automated Import Using ImportXLS: Province Import
Importing data for a provincial model can be done with the Province Data Import Feature. IFs does not need to be sub-regionalized to use this feature.
The batch update feature can be reached through IFs main menu:
IFs -> MainMenu->Extended Features -> Manage Country Data->Historic Data File Processing-> Import Data from XLS Provinces
The form that opens up is shown below. The format reflects the single series import process already described. A recognized excel format must be selected from the list on the right. The location of Province names, Years, and Series from your chosen excel data sheet must be designated. The provincial country concordance table must also be selected from the drop down list. The form contains the option to view the excel sheet you are importing, and to view the country concordance tables. Lastly, the variable you are importing needs to be selected from the drop down list. Existing variables will populate the definition field. New variables will need to be named using the Ifs naming convention reviewed above, and defined.
Passing Extracted Data for Vetting
Extracted data will be saved in Data\IFsDataImport.Mdb. Dictionary info is saved in a table named "datadict" inside this same .mdb. You need to send this .mdb and all external source Excel to the person who will do the vetting. Some initial scrutiny of the data before it is sent for vetting is recommended. The new automated vetting feature of IFs (described in the vetting section below) can be useful.
