Basic Report (Download): Difference between revisions
No edit summary |
No edit summary |
||
| (4 intermediate revisions by 2 users not shown) | |||
| Line 1: | Line 1: | ||
The Basic Report can be found | The ''Basic Report for Countries/Regions or Groupings'' can be found from the Main Menu: choose '''Display''' and then click '''''Basic Report for Countries/Regions or Groupings''.''' It can also be accessed through the ''[[Main Menu Map Pop-up|Main Menu Pop-up]]'' by clicking on a country from the Main Menu map. | ||
As the name suggests, this display feature presents a basic report of some important variables for selected countries or groups. The report displays annual data and forecasts in ten year increments from 2020 to 2050. Click on a variable name to open a Table Display for that variable for all saved scenarios. | |||
[[File:Example of Basic Report.png|center|thumb|950x950px|Example of the Basic Report for Countries/Regions or Groupings page for Kenya.]] | |||
There are several options and features on this page: | |||
* [[Repeated Features#General%20Display%20Options|'''Continue''']]: Go back to the previous menu or to the Main Menu of IFs. | |||
* '''View''': Choose '''Normal''' to display indicators in annual form, '''Percent Change from First Year''', or '''Percent Change from Base Year'''. Current selection will have a checkmark next to it. | |||
* '''Explain Scenarios''': | |||
** '''Explain Selected Scenario''': Reveal assumptions and parameter changes behind the selected scenario. | |||
** '''Explain File Numbering''': Open pop-up with explanation to scenario numbering. | |||
* '''Switch''': | |||
** '''Use Groups''' or '''Use Country/Regions''': Change between displaying groups or countries and regions. If Country/regions are currently selected then '''Use Country/Regions''' will be displayed from the dropdown and vice versa. | |||
** '''Switch to Report2''' or '''Report1''': Change to view a different set of variables. If Report 1 is currently selected then '''Switch to Report2''' will be displayed and vice versa. | |||
* '''Help''': Open the corresponding page in the [[Main Page|Pardee Wiki]]. | |||
Display Option Fields: | |||
* '''Countries or Regions''': Choose desired country or group from the drop down. | |||
* '''Select Scenario''': Select the desired scenario(s) from the drop down. Hold ctrl to select more than one scenario. | |||
= <span style="font-size:xx-large;">Multiple Grid View</span> = | |||
<div style="text-align: center; color: red; font-weight: bold; font-size: 200%;"> | |||
Feature is no longer available or outdated in the model. | |||
</div> | |||
You can click on the Switch to Multiple Grid toggle at the top of the menu to switch to a different and, for some users, preferable form of display. You will be presented with a multiple grid table that separates variables into different categories. From the Multiple Grid report, you are able to accomplish the same functions as were explained above in the Single Grid report section, however, years are not displayed across the column headers. A new scroll-down list appears between the country/regions list and the Run-Result-File list. You now can specifically choose the year you would like displayed. | You can click on the Switch to Multiple Grid toggle at the top of the menu to switch to a different and, for some users, preferable form of display. You will be presented with a multiple grid table that separates variables into different categories. From the Multiple Grid report, you are able to accomplish the same functions as were explained above in the Single Grid report section, however, years are not displayed across the column headers. A new scroll-down list appears between the country/regions list and the Run-Result-File list. You now can specifically choose the year you would like displayed. | ||
[[File:Basic1.gif|center|Example of a multiple grid view in IFs]] | [[File:Basic1.gif|frame|center|Example of a multiple grid view in IFs]] | ||
Latest revision as of 10:51, 1 August 2025
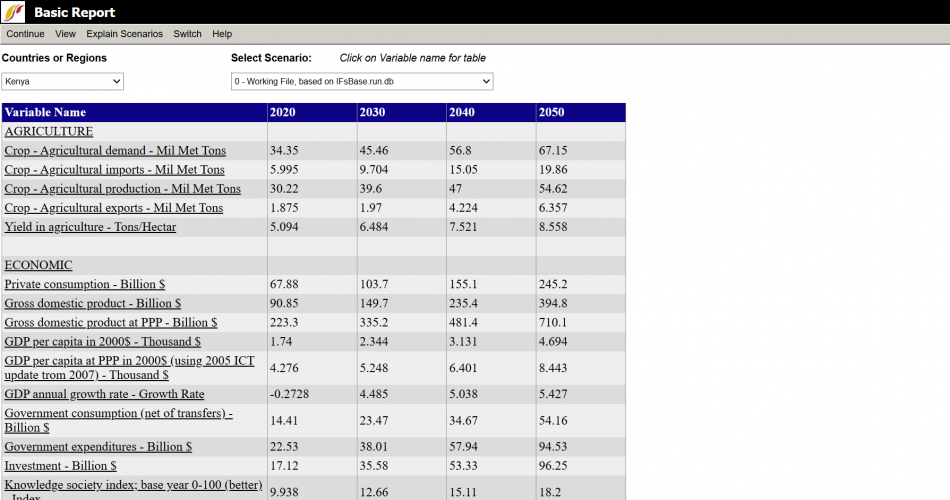
The Basic Report for Countries/Regions or Groupings can be found from the Main Menu: choose Display and then click Basic Report for Countries/Regions or Groupings. It can also be accessed through the Main Menu Pop-up by clicking on a country from the Main Menu map.
As the name suggests, this display feature presents a basic report of some important variables for selected countries or groups. The report displays annual data and forecasts in ten year increments from 2020 to 2050. Click on a variable name to open a Table Display for that variable for all saved scenarios.
There are several options and features on this page:
- Continue: Go back to the previous menu or to the Main Menu of IFs.
- View: Choose Normal to display indicators in annual form, Percent Change from First Year, or Percent Change from Base Year. Current selection will have a checkmark next to it.
- Explain Scenarios:
- Explain Selected Scenario: Reveal assumptions and parameter changes behind the selected scenario.
- Explain File Numbering: Open pop-up with explanation to scenario numbering.
- Switch:
- Use Groups or Use Country/Regions: Change between displaying groups or countries and regions. If Country/regions are currently selected then Use Country/Regions will be displayed from the dropdown and vice versa.
- Switch to Report2 or Report1: Change to view a different set of variables. If Report 1 is currently selected then Switch to Report2 will be displayed and vice versa.
- Help: Open the corresponding page in the Pardee Wiki.
Display Option Fields:
- Countries or Regions: Choose desired country or group from the drop down.
- Select Scenario: Select the desired scenario(s) from the drop down. Hold ctrl to select more than one scenario.
Multiple Grid View
Feature is no longer available or outdated in the model.
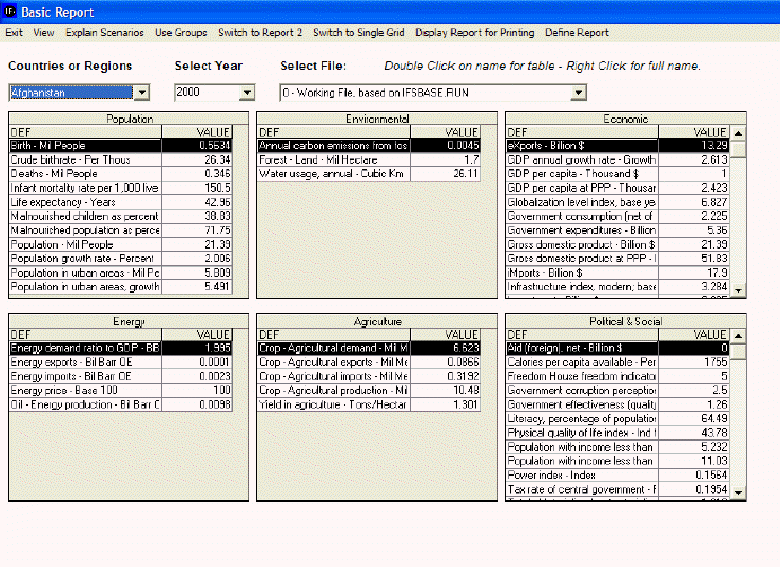
You can click on the Switch to Multiple Grid toggle at the top of the menu to switch to a different and, for some users, preferable form of display. You will be presented with a multiple grid table that separates variables into different categories. From the Multiple Grid report, you are able to accomplish the same functions as were explained above in the Single Grid report section, however, years are not displayed across the column headers. A new scroll-down list appears between the country/regions list and the Run-Result-File list. You now can specifically choose the year you would like displayed.

