Country/Region, Group or G-List: Difference between revisions
(Created page with "186 countries underpin the functioning of IFs and these countries can be displayed separately or as parts of larger groups that users can determine. ''Below is a visual repre...") |
No edit summary |
||
| Line 3: | Line 3: | ||
''Below is a visual representation of how different entities are organized into Countries/Regions, Groups or Glists:'' | ''Below is a visual representation of how different entities are organized into Countries/Regions, Groups or Glists:'' | ||
[[File:Geo 186.png|center]] | [[File:Geo 186.png|center|Geo 186.png]] | ||
''*Note: In older versions of IFs, Regions were used as intermediaries between Countries and Groups. In the future, they, or some similarly named unit, will be a sub-unit of Countries. Regions, acting as a sub-unit of Countries, are currently not a feature of IFs. See the image located at the bottom of this Help topic.'' | ''*Note: In older versions of IFs, Regions were used as intermediaries between Countries and Groups. In the future, they, or some similarly named unit, will be a sub-unit of Countries. Regions, acting as a sub-unit of Countries, are currently not a feature of IFs. See the image located at the bottom of this Help topic.'' | ||
| Line 16: | Line 16: | ||
Users may also want to [http://www.du.edu/ifs/help/use/extended/manageregion/change.html create their own groups] or [http://www.du.edu/ifs/help/use/extended/manageregion/identify.html explore what countries are members of what groups]. | Users may also want to [http://www.du.edu/ifs/help/use/extended/manageregion/change.html create their own groups] or [http://www.du.edu/ifs/help/use/extended/manageregion/identify.html explore what countries are members of what groups]. | ||
= <span style="font-size:xx-large;">Change Grouping/Regionalization</span> = | |||
<span style="font-size:xx-large;"></span> | |||
To change countries in certain regions or groups, click on Extended Features on the Main Menu of IFs, and then select Manage Regionalization. | |||
How do I change the geographic representations of IFs? | |||
This is an advanced topic, and many users may wish to change or add Grouping designations to IFs for analysis purposes. However, before describing the processes, it is important to understand the geographic conceptualizations used in IFs. Learn more about the building blocks of IFs. | |||
[[File:Groups2.gif|center]]'''Changing or Adding Groupings. '''On the above form, choose the Switch to Groups option. The list box on the left displays the current Groups of IFs (yours may differ from the one above). The list box in the middle provides check boxes for all countries/regions in your version of IFs; it allows you to change the membership of the Groups in the left-most box. The list box on the right shows the full set of country/region members of whatever group you select in the left-most box. Select one of the groups in the left box by clicking on it; you should see changes in both of the other two boxes as they display the country/region membership of the group and, in the case of the middle box, give you the opportunity to change that membership. | |||
'''Editing Membership in a Group.''' The menu options provide help editing groupings. Let’s try adding a member to an existing group. Click on the Group name in the left-hand list to activate it. You will see the group members on the right. Arbitrarily pick and country/region in the middle list that is not checked and check the box in front of its name. After you check it, note that the name is still not in the right-hand list. Now click on the Register Member Changes option from the menu. Note that the country/region is added immediately to the right-hand list. Your editing is complete. You could now exit the form and begin displaying results for the redefined group (or use the group as the basis for parameter change in scenario analysis). But instead, uncheck the box in front of the country/region name and again click on Register Member Changes. You will have undone your arbitrary change. | |||
'''Adding a Group:''' Now let’s add a Group. Click on the Add Group option. The system will first confirm that you want to make such a change. Proceed. When asked for a name of the Group, provide that name if you have one in mind for a new group or type Test if you do not. After hitting the Enter key, you will see the new Group at the bottom of the left-hand list. | |||
At this point the Group has been created, but has no members. With the name of the Group in the left-had box activated, select its members by activating the appropriate check-boxes in the middle column. When you have finished that, touch the Register Member Changes option. You will see the members of your Group pop up in the right-hand box. | |||
You can now Exit from the form. You should see a message box that indicates no errors in what you have done. Then you will see a message indicating that your new group has been added to a file of IFs that maintains such groupings. That means that even when you stop the model and begin again later, the new Group will be defined. Go to one of the Display options and try to create a table for the new Group. It should work just like any other. | |||
If you have created a Test group, however, you probably do not want it to always remain an option. So go back into Change Regionalization/Grouping, select the Test group in the left-hand window, and touch the Delete Group option. Again the program will ask for confirmation. Provide it and proceed. | |||
There should be no limit on the number of Groups that you can designate in this way. | |||
<span style="font-size:xx-large;"></span> | |||
Revision as of 20:11, 21 July 2017
186 countries underpin the functioning of IFs and these countries can be displayed separately or as parts of larger groups that users can determine.
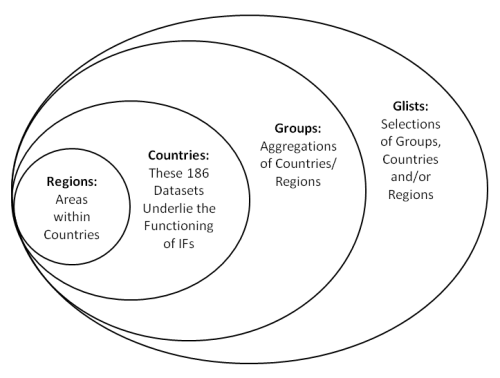
Below is a visual representation of how different entities are organized into Countries/Regions, Groups or Glists:
*Note: In older versions of IFs, Regions were used as intermediaries between Countries and Groups. In the future, they, or some similarly named unit, will be a sub-unit of Countries. Regions, acting as a sub-unit of Countries, are currently not a feature of IFs. See the image located at the bottom of this Help topic.
When using IFs, there are many occasions where the user is asked whether or not they would like to display their results as a product of single countries, or larger groups. This is typically a toggle switch that moves between Country/Region and Groups, however, it might be a three-way-toggle that includes Country/Region, Group and Glist.
Countries/Regions are currently the smallest geographical unit that users can represent. The ability to split countries down into smaller regions, or states, is under development. There are 186 different countries/regions that users can display.
Groups are variably organized geographically or by memberships in international institutions/regimes. You can find out who is represented in each group and add or delete members by exploring the Managing Regionalization function.
Glists merge both Groups and Countries/Regions. These lists are mostly geographically bound. In the future, the Glist distinction will become more important as some users may want to place, for example, both the Indian state of Kerala in a Glist with Sri Lanka and Nepal.
Users may also want to create their own groups or explore what countries are members of what groups.
Change Grouping/Regionalization
To change countries in certain regions or groups, click on Extended Features on the Main Menu of IFs, and then select Manage Regionalization.
How do I change the geographic representations of IFs?
This is an advanced topic, and many users may wish to change or add Grouping designations to IFs for analysis purposes. However, before describing the processes, it is important to understand the geographic conceptualizations used in IFs. Learn more about the building blocks of IFs.
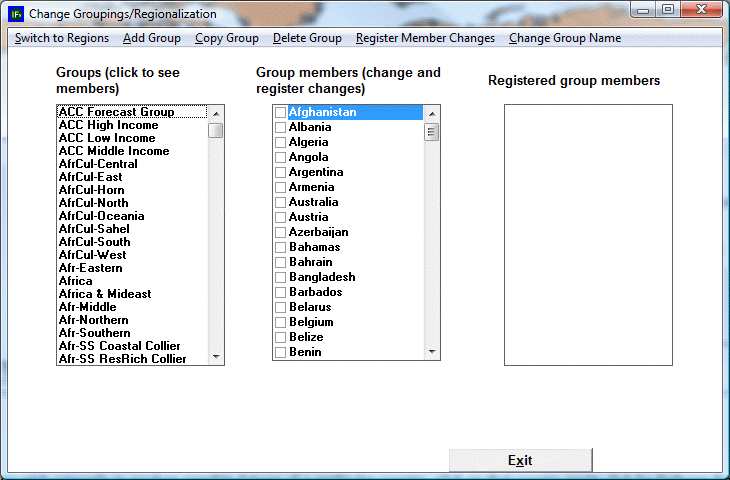
Changing or Adding Groupings. On the above form, choose the Switch to Groups option. The list box on the left displays the current Groups of IFs (yours may differ from the one above). The list box in the middle provides check boxes for all countries/regions in your version of IFs; it allows you to change the membership of the Groups in the left-most box. The list box on the right shows the full set of country/region members of whatever group you select in the left-most box. Select one of the groups in the left box by clicking on it; you should see changes in both of the other two boxes as they display the country/region membership of the group and, in the case of the middle box, give you the opportunity to change that membership.
Editing Membership in a Group. The menu options provide help editing groupings. Let’s try adding a member to an existing group. Click on the Group name in the left-hand list to activate it. You will see the group members on the right. Arbitrarily pick and country/region in the middle list that is not checked and check the box in front of its name. After you check it, note that the name is still not in the right-hand list. Now click on the Register Member Changes option from the menu. Note that the country/region is added immediately to the right-hand list. Your editing is complete. You could now exit the form and begin displaying results for the redefined group (or use the group as the basis for parameter change in scenario analysis). But instead, uncheck the box in front of the country/region name and again click on Register Member Changes. You will have undone your arbitrary change.
Adding a Group: Now let’s add a Group. Click on the Add Group option. The system will first confirm that you want to make such a change. Proceed. When asked for a name of the Group, provide that name if you have one in mind for a new group or type Test if you do not. After hitting the Enter key, you will see the new Group at the bottom of the left-hand list.
At this point the Group has been created, but has no members. With the name of the Group in the left-had box activated, select its members by activating the appropriate check-boxes in the middle column. When you have finished that, touch the Register Member Changes option. You will see the members of your Group pop up in the right-hand box.
You can now Exit from the form. You should see a message box that indicates no errors in what you have done. Then you will see a message indicating that your new group has been added to a file of IFs that maintains such groupings. That means that even when you stop the model and begin again later, the new Group will be defined. Go to one of the Display options and try to create a table for the new Group. It should work just like any other.
If you have created a Test group, however, you probably do not want it to always remain an option. So go back into Change Regionalization/Grouping, select the Test group in the left-hand window, and touch the Delete Group option. Again the program will ask for confirmation. Provide it and proceed.
There should be no limit on the number of Groups that you can designate in this way.

